Thursday, March 8, 2012

Thankfulness: Naming the Gifts, Living in Grace

When I first started blog, it was part of an endeavor to focus on the simple delights in life, seeing the hand of God in my life, and thankfulness in everything. It's about this pursuit to live life to the fullest in Christ. I certainly don't have it all figured out (knowing God is the journey of a lifetime), but by God's grace, I want to learn step by step what it means to walk with Christ and to know Him.

As I was starting up this blog, a friend told me that the theme of my blog reminded her a lot of Ann Voskamp's book One Thousand Gifts and her blog, www.aholyexperience.com. Intrigued, I decided to check out the site and ended up ordering the book. This book has turned out to be a profoundly influential one in my life. The subtitle of One Thousand Gifts sums up so well how I want to live: Dare to Live Fully Right Where You Are. Ann says:

"'Wherever you are, be all there.' I have lived the runner, panting ahead in worry, pounding back in regrets, terrified to live in the present, because here-time asks me to do the hardest thing of all: just open wide and receive... This is where God is. In the present. I AM--His very name... 'Wherever you are, be all there' is only possible in the posture of eucharisteo. I want to slow down and taste life, give thanks, and see God." -One Thousand Gifts (p. 69, 77)

The theme of the book centers around the concept of eucharisteo, a Greek word that means giving thanks. The root word of eucharisteo is charis, which means "grace." And the derivative of charis is the Greek word chara, which means "joy." She talks about seeing God's grace in every aspect of our lives, and naming the gifts. It's all a very practical way of living out the "in everything give thanks" that God has called us to.

I resonate with Ann and her struggle to live fully in the present. How easy it is for my mind to mull over how I wish I had handled things better in the past, fear the unknowns of the future, or miss out on moments of today. "The secret to figuring out life: All is grace--because God is transfiguring all things for His glory," says Ann. I want to learn how to give thanks in everything. And in doing so, learn how to not be yanked back to the past or run ahead to the future, but to bloom where God has planted me, so to speak.

I want to start using this blog as one way of chronicling God's faithfulness and a tangible way of expressing thankfulness. Here are a few things I'm thankful for today, in no particular order:

* Rain watering the earth, bringing the new life of spring, and the thunder that accompanies it
* Quiet morning at home to relax
* Beautiful flowers on the table, a thoughtful gift from my husband
* Financial needs always met, sometimes in unexpected ways
* The cozy apartment we have been blessed to call home these past seven months
* Mercies new every morning, learning to trust His grace for my struggles and shortcomings
* Delicious, homemade granola for breakfast
* A godly, committed and loving husband, precious gift from God
* Encouraging words from my mom
* A job where I get to sample delicious, gourmet coffees


Care to join me on this journey? What are you thankful for? How can you practice eucharisteo today?


Tuesday, February 28, 2012

Peanut Butter + Chocolate = Scrumptious

It's been way too long since I've updated this. My intention is to be more consistent for my readers, so my apologies. It's been a busy several weeks. However, I hope it's been worth the wait because today I'm featuring one of my very favorite dessert recipes--a recipe that combines two very good things: peanut butter and chocolate.

And really, how can you go wrong with peanut butter and chocolate? Both ingredients are amazing, and when combined together they are just--wow. These peanut butter bars, complete with a chocolate topping and peanut butter glaze, are definitely a crowd-pleaser and a tantalizing feast for your taste buds.

These are one of my tried and true recipes. I made them for my husband's birthday--the first one we celebrated together, back when he was my boyfriend. Lukas jokingly said I was trying to "fatten him up." Lukas is not a big dessert eater and yet he loves these peanut butter bars. I also made them for one of the first meals I cooked for my in-laws after Lukas and I moved into our new apartment. And I served them to family and friends at a game night we hosted recently. They are always met with raving reviews.


Peanut Butter Bars
Base of the bars
1/2 cup margarine or butter
1/2 cup white sugar
1/2 cup brown sugar
1 egg
1/3 cup peanut butter
1/2 teaspoon baking soda
3/4 tsp. salt
1/4 teaspoon vanilla
1 cup flour
1 cup oatmeal

Topping
1 cup chocolate chips

Glaze
1 cup powdered sugar
1/3 cup peanut butter
1/4 cup milk

Cream butter and sugars for the base of the bars, blend everything else in. Put in a greased 9x13 pan. Bake at 350 degrees for 10-13 minutes.

While it is cooking, gather the chocolate chips for the topping and blend the glaze ingredients together (you want the glaze to be fairly thick, but also at a consistency where you can drizzle it onto the bars). After removing the bars from the oven, sprinkle with the chocolate chips. Let stand 10 minutes. Drizzle with glaze.

Let cool (at least most of the way) before serving. They will keep their shape better this way. Enjoy!

Saturday, February 4, 2012

Paella: Delicious Spanish Cuisine

Join me for a walk down memory lane and let me share a wonderful Spanish dish that I tried while studying abroad in Spain three years ago and recently decided to recreate in my own kitchen.

I spent a four months studying abroad in Seville, Spain (Sevilla as the Spaniards would say) during spring semester 2009. I still think nostalgically about that beautiful city, filled with art and historical sites almost around every corner. What a special opportunity it was to spend that time there, immersed in a culture so different from my own.

Sevilla was definitely a pedestrian city, and we walked just about everywhere. One Saturday, my roommate and I decided to wander around to some local shops and try a Spanish restaurant. Our meal of choice was the famous Spanish dish of paella, a sauteed mix of rice, vegetables, spices and meat or seafood. It was delicious and one of my favorite foods in Spain.

I was so excited when I found a recipe for paella in my Taste of Home cookbook. This recipe takes some time to assemble, but it's fairly straightforward and is well worth the effort. The original recipe was too big for just my husband and me, so the recipe below is my modified, halved version. It makes about 5-6 servings.


Paella
  • 2 cups chicken broth
  • 1-1/4 cups uncooked long grain rice
  • 1/2 cup chopped onion
  • 1-2 teaspoons minced garlic, divided
  • 1/2 teaspoon salt
  • 1/4 teaspoon ground turmeric
  • 1/8 teaspoon pepper
  • 1 bay leaf
  • 1/2 green pepper
  • 2 green onions, sliced
  • 1/2 teaspoon parsley
  • 1/2 teaspoon dried thyme
  • 1/8 teaspoon hot pepper sauce
  • 1 tablespoon olive oil
  • 1 medium tomato, chopped (or equivalent in canned tomatoes)
  • 1 cup frozen peas
  • 1 tablespoon lemon juice
  • 1 to 1-1/2 pounds boneless skinless chicken breasts

In a large saucepan, combine the broth, rice, onion, half of the garlic, salt, turmeric, pepper and bay leaf. Bring to a boil. Reduce heat; cover and simmer for 20 minutes or until rice is tender.


Meanwhile, in large skillet, saute the green pepper, green onions, parsley, thyme, hot pepper sauce and remaining garlic in oil for 2 minutes. Cook until green pepper is crisp-tender. Add tomatoes and peas; heat through. Discard bay leaf from rice mixture. Stir rice into vegetable mixture and keep warm.


In a large nonstick skillet, cook chicken in lemon juice. I also added a little olive oil. (The recipe also called for shrimp, which I left out because it is not necessary and I don't usually have it on hand. However, you can add it if desired.)


Once cooked, add meat to rice and vegetable mixture.


We served the paella with some garlic green beans on the side. Yum!

Buen provecho!

Tuesday, January 17, 2012

Crockpot Cooking: Shredded Beef Tacos

We were given a crockpot for a wedding gift, and I've been looking forward to trying it out for a while now. Last week I finally got around to doing so. I think my husband can attest to how excited I was about cooking in it for the first time--pretty sure I talked about it quite a bit! For my first endeavor in crockpot cooking, I decided to make a recipe that I got from my mom: Shredded Beef Tacos. They are delicious and unique from other taco recipes I've tried.


This recipe makes enough for at least 10-12 tacos, if not more, depending on the size of your roast and how full you fill the tortillas. The roast I used was about two and a half pounds. My husband and I have been taking leftovers to work with us for lunches, but leftovers are also supposed to freeze well if you want to save some for later.

After I successfully made my first crockpot meal, my conclusion is this--I love crockpots and can't wait to find more ways to make use of this great invention. It was wonderful to come into our apartment when I got back from work to the wafting smell of slow cooking roast. And the best part was actually eating the tacos!

Shredded Beef Tacos
  • 2-4 pound Roast
  • 1 package taco seasoning
  • Adobo Seasoing (2-3 tsp)
  • 2 cups black beans (rinsed and drained)
  • 1 cup salsa
  • 1-2 cups frozen corn

Place roast in a the crockpot. (You may want to trim off some fat first--I was able to get a much leaner cut of meat by doing this). Sprinkle Adobo seasoning and taco seasoning packet on top, as well as black beans, corn and salsa. The recipe calls for 2-3 teaspoons, though I didn't really measure it out--just sprinkled until it looked like the top of the roast well well coated. For those of you who have never used Adobo seasoning, it's a wonderful spice combination including salt, oregano, onion powder, garlic powder, pepper and other spices. You will probably not find it on the aisle with the rest of the spices; I found it on the Hispanic food aisle. It's one of those hidden gems that you might not find if you don't know what you're looking for. (Extra tidbit about Adobo seasoning: It also makes great seasoning on top of baked tilapia if you want an additional use for it.)


Cook all day on low--about 8-10 hours. It's well worth the longer cooking time--it came out really tender and moist and fell apart when I shredded it.


When meat is done, transfer to a large pan and shred with two forks. Mix meat back into sauce in crockpot.


Serve on tortillas with sour cream and cheese. Yum!

Monday, January 9, 2012

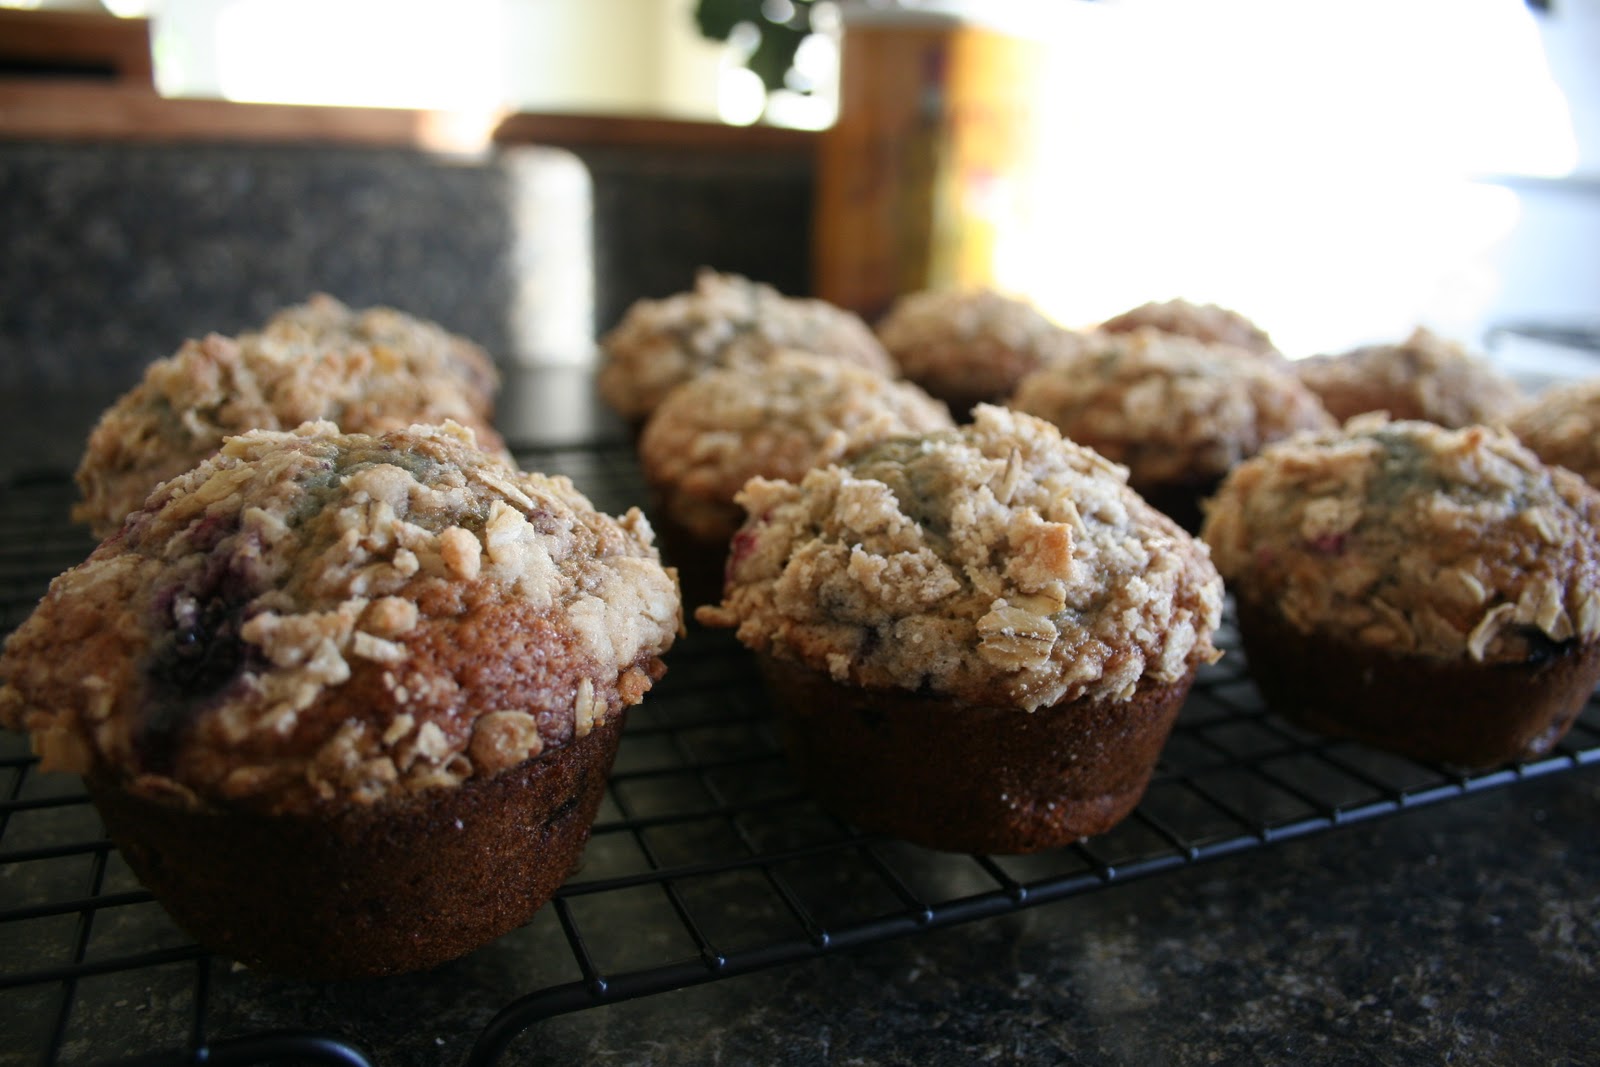
Berry Cream Muffins

Cooking is a simple delight for me. There is something immensely satisfying about combining a variety of ingredients and ending up with something tasty to eat. And the things you can come up with are endless!

After getting married last summer and now having an apartment of our own, my love for cooking and spending time in the kitchen has really taken off. There is something really special about having my own kitchen, doing my own meal planning and stocking the kitchen with the ingredients I like or want to try. I have found a whole new world in searching for recipes and finding creative ways to make meals, pastries, desserts, side dishes, etc., as well as trying old tried and true recipes that bring back nostalgic childhood memories (I had a mom who is a great cook to set an example for me!).

The recipe below is for Berry Cream Muffins. I found the recipe in my Taste of Home cookbook, which my grandma gave me as a Christmas gift about a year ago. 


These Berry Cream Muffins, I must say, are now one of my all-time favorite muffin recipes. They are very moist and flavorful, and they are great to have with a bowl of cereal for breakfast, as a snack or even as a dessert. I made these today, and when my husband, Lukas, walked in the door, one of the first things he did was comment on how good the house smelled. When I told him what I had made, he wasted no time in doing a little dance to the kitchen to sample the freshly baked goods, which was followed by many "Mmm's." :)

Berry Cream Muffins
2 cups all-purpose flour
1 cup sugar
½ teaspoon baking powder
½ baking soda
½ teaspoon salt
1 ½ cup fresh or frozen raspberries, blueberries or blackberries
2 eggs, lightly beaten
1 cup sour cream or yogurt
½ cup vegetable oil
½ teaspoon vanilla

Combine flour, sugar, baking powder, baking soda and salt; add berries and toss gently. I have tried this recipe with blueberries, raspberries, and as shown in this blog, a mix of blueberries, raspberries, blackberries. They all turned out delicious. 


Combine eggs, sour cream/yogurt, oil and vanilla. Stir into dry ingredients just until moistened. The recipes turn out well with either sour cream or a flavored yogurt. Today I used a raspberry yogurt, supplemented with a little bit of sour cream to get the full cup specified by the recipe. Either way, the yogurt and/or sour cream makes these muffins delightfully moist!


Fill greased muffin cups. Bake at 400 degrees for 18-22 minutes. This recipe makes about 12 muffins.

Optional Streusel Topping: 
You don't have to do the streusel, but I've always included this. Really, who doesn't like a sweet, crunchy, cinnamon topping on the top of a muffin? For the streusel, mix 3 tablespoons all-purpose flour, 3 tablespoons quick cooking oats, 2 tablespoons sugar and 1/8 teaspoon ground cinnamon. Cut in 2 tablespoons cold butter until crumbly. Sprinkle over muffins before baking.


And there you have it. One of my very favorite muffin recipes! Happy baking!

Thursday, January 5, 2012

A Journey of Delight

Simple Delight.

That's the theme of this blog, which may sound a little obscure at first, but to me these two words are ones of great significance. My husband, Lukas, first started using the phrase and it’s one that has stuck with me. The words “Simple Delight” have to do a lot with what with what God has been teaching me. They are a description of the kind of person I want to be, and by the grace of God, it is an area in which I hope to continue to grow. 

I like how Jim Elliot put it “Wherever you are, be all there.” It’s about having a simple contentedness in a busy world. A commitment to thankfulness no matter what the circumstances. A commitment to learning to rejoice in all things and see the good in things, even when things are difficult or challenging or seem less than ideal.

I don't want to miss out on the simple delights of life. A sunrise. Going on a walk. Spending time with a loved one. Making my apartment homey and inviting. The satisfaction of making a delectable meal or dessert. Simple creative outlets. Putting my best foot forward every day at work. Laughter. The little and big blessings that make up life. The blessings that are so easy to take for granted or miss if we’re not intentional. It's too easy to waste precious moments worrying, analyzing the past, contemplating the future, or getting frustrated with challenges. This shouldn’t be! I want to live life to the fullest!

So what will this look like for a blog? The idea is to fill this blog with things that inspire simple delight in me, whether a recipe worth trying, the beauty of nature, decorating ideas, or musings about life. Please let me know if you have any suggestions. What are simple delights in your life? I hope you’ll join me for this journey.

Photo by Anna Keagy