This evening I am daydreaming about Peru. Lukas and I were blessed to be able to take a two-week trip to Peru in December to visit his family (they are missionaries in Lima).

It was wonderful to get to see family, explore a new and colorful country, and experience the places Lukas has told me about. The trip included exploring Lima, as well as a day and a half trip to the rainforest in Pucallpa, Peru.

Peru is filled with rich history, interesting cultural experiences and, of course, delicious food. Oh, the food... so good!
Since I can't eat Peruvian food in Peru all the time, I'm sure glad I learned from Lukas' mom how to make a few favorite Peruvian dishes. And one of the best is pollo saltado or lomo saltado. More commonly in Peru you find the lomo saltado variation, which includes thinly sliced beef tenderloin or some other type of thinly sliced steak. However, it is sometimes served with chicken instead, thus creating the cousin dish of pollo saltado, featured below. Both are delectable, but at home we have made it with chicken because it is cheaper and we more commonly have it on hand.
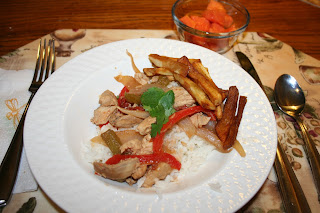
Whichever meat you choose to use, this dish includes a bed of rice, with flavorful, tender marinaded meat cooked with vegetables and then topped with French fries. I know, French fries seem like an odd addition, but they add the perfect touch to this dish.
It's making my mouth water just thinking about it.

Pollo Saltado
This recipe makes enough for about 4-6 servings.


Once meat and vegetables are tender, add 1/2 can of drained tomatoes to the mixture and heat (or 1-2 fresh tomatoes if you have them on hand).
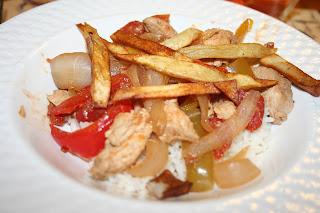
Serve layered with rice, French fries, and meat and veggies mixture. Sprinkle cilantro on top.
And there you have it--a signature Peruvian dish that you can make at home. It's chock full of flavor. OK, now that I have written all about it, I may just need to make it again, just to let the flavors take me back to Peru again! :)
Buen provecho!

It was wonderful to get to see family, explore a new and colorful country, and experience the places Lukas has told me about. The trip included exploring Lima, as well as a day and a half trip to the rainforest in Pucallpa, Peru.

Peru is filled with rich history, interesting cultural experiences and, of course, delicious food. Oh, the food... so good!
Since I can't eat Peruvian food in Peru all the time, I'm sure glad I learned from Lukas' mom how to make a few favorite Peruvian dishes. And one of the best is pollo saltado or lomo saltado. More commonly in Peru you find the lomo saltado variation, which includes thinly sliced beef tenderloin or some other type of thinly sliced steak. However, it is sometimes served with chicken instead, thus creating the cousin dish of pollo saltado, featured below. Both are delectable, but at home we have made it with chicken because it is cheaper and we more commonly have it on hand.
Whichever meat you choose to use, this dish includes a bed of rice, with flavorful, tender marinaded meat cooked with vegetables and then topped with French fries. I know, French fries seem like an odd addition, but they add the perfect touch to this dish.
It's making my mouth water just thinking about it.

Pollo Saltado
- 1/2 cup soy sauce
- 1/2 cup vinegar
- 2 tsp cumin
- 10-12 cloves garlic (divided)
- 2 chicken breasts
- 2 cups uncooked rice
- Canola oil
- 1 whole onion plus 1/3 onion (divided)
- 2 bell peppers, julienned (multi-colored is our favorite)
- 1/2 14 oz. can of tomatoes (drained) or fresh tomatoes (the equivalent of about 7 oz.)
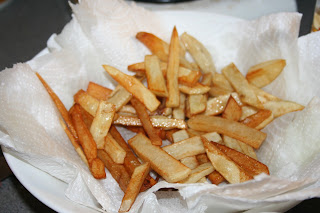
- 2 potatoes, sliced into French fries (or equivalent in store bought fries)
- Cilantro
This recipe makes enough for about 4-6 servings.

Marinade chicken overnight in soy sauce, vinegar, cumin and four cloves minced garlic. This picture only shows one chicken breast, but you will want to use two.
The next day to begin cooking this dish, saute dry rice with 1/3 cup finely chopped onion and 6-8 garlic cloves, minced. This can be done on the stove with a bit of oil. Once some (not all) of the grains of rice start to turn golden, take sauteed rice mixture and cook in rice maker or on stove with 2 2/3 cups water.

While rice is cooking, slice up one large onion and bell peppers. You can use all one color, but we usually use multi-colored bell peppers because they look so pretty.

Chop up chicken in bite-sized pieces, and cook on stove with a good portion of the marinade, bell peppers and onion. The marinade gives the mixture an amazing flavor when it all cooks together.

Slice potatoes and cook French fries in oil on the stove (if you make them from scratch) or bake French fries in the oven if you use store bought fries. We've done it both ways, and I think it tastes equally good either way. It definitely saves time and effort to use the store bought fries and that's the route I've gone the last couple times we've made pollo saltado. If you go this route, use about enough French fries to cover a baking sheet. However, making them from scratch probably makes it slightly more authentic. :)


And there you have it--a signature Peruvian dish that you can make at home. It's chock full of flavor. OK, now that I have written all about it, I may just need to make it again, just to let the flavors take me back to Peru again! :)
Buen provecho!